bods-dev-handbook
Translations
The processes, roles and mechanisms detailed below implement the BODS Language Support Policy.
Note: This process is still in development, and improvements or clarifications are welcome.
The following instructions cover the translation of:
- A version of the Beneficial Ownership Data Standard (BODS) schema, including its codelists
- The corresponding documentation website
- The documentation website’s theme
Locations of source files to be translated
BODS schema and codelists exist under the schema folder within the BODS Github repository. The content for the BODS documentation website exists under the docs folder within the same BODS Github repository. The documentation website’s theme has its own Github repository - data-standard-sphinx-theme.
By translating the three components listed above the publicly available website at https://standard.openownership.org can be published in different languages. This is the aim of the translation work.
Scope of translation work
Things that are in scope for translation are:
- All prose in the documentation.
- Text such as menu items and footers in the documentation theme.
- The values of schema fields
titleanddescription. - The values of codelist fields
title,descriptionandtechnical note. - The SVG diagrams in the documentation.
Things that are not in scope for the translation are:
- The names of schema objects
- The values of schema fields
typeandrequired - The names of codelist objects
Things that need to become part of the translation workflow but are not yet:
- The example data in the data-standard repo.
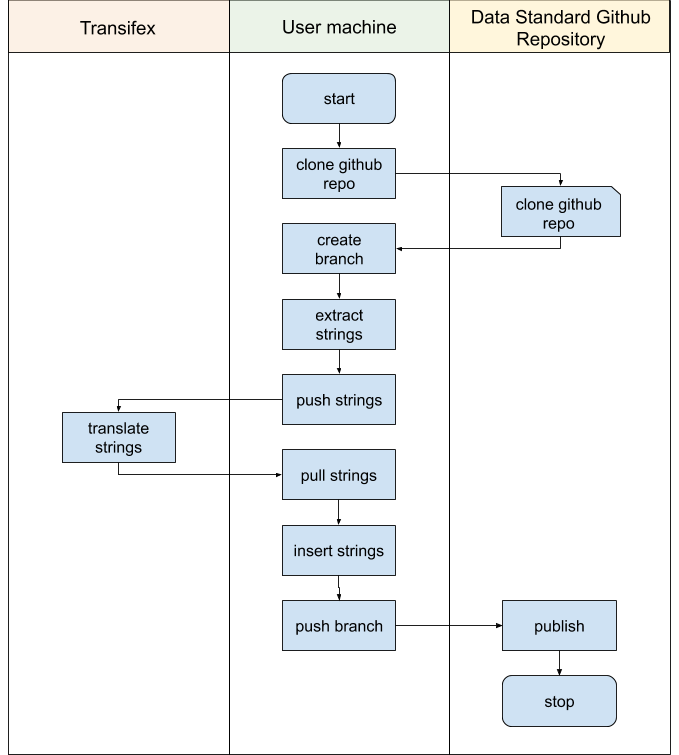
Overview of the translation workflow
The workflow for doing the translation is:
- extract the strings that need to be translated from the repositories
- push the strings up to their Transifex project
- have the strings translated, reviewed and proofread
- pull the translated strings down from Transifex
- upload them to their respective repositories and
- make them live on the website.
The diagram below provides an extremely high-level overview of the workflow. It excludes the final step of making the translation live.
BODS on Transifex
BODS translations are found under the Open Data Services Transifex account.
The BODS documentation and schema are in BODS-main (for the latest in-development version), or versioned projects (for versioned releases of the standard), e.g. v0.1 ‘project’ is bods-v01. Once a translation has been completed in BODS-main a snapshot should be taken and renamed under the relevant project name or version, see steps to snapshot a translated release.
A Transifex project contains ‘resources’, each of which correspond to a page of documentation (an individual RST file) plus one each for the schema, codelists and SVG files. These may also be referred to as ‘source files’.
The translations for the documentation theme (menu items, footer text, etc) are in the bods-theme Transifex project, which contains only one resource for all the strings in the theme templates.
Getting set up
The following steps get your system set up to follow the translation workflow (assumes Ubuntu 22.04 LTS or similar).
Summary:
- Set up an account and join the ODS organization in Transifex.
- Clone the repositories to manage the workflow.
- Install and configure the Transifex client.
These steps are explained in more detail in the next sections.
Set up an account and join the ODS organization in Transifex
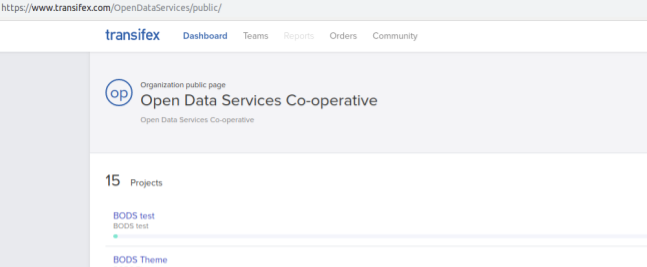
A list of translation projects Open Data Services manage via Transifex is visible at the Open Data Services Co-operative public page.
-
Create a free Transifex account on their sign up page.
-
Ask an administrator of ODS to make you an administrator for the BODS projects. We don’t maintain a list of those administrators here, but there is a considerable overlap with the people who contribute towards the BODS repository.
Clone the repositories to manage the workflow
- Follow the instructions in the BODS data-standard-sphinx-theme README.md. These instructions will clone both the data-standard-sphinx-theme and data-standard repositories to your local machine.
- If you already have the repositories, make sure you pull the most up to date version of the branch you’re working on, and have updated the requirements.
Install and configure the software
If you are using the BODS development environment, this has already been installed and you can skip to Configuration.
The Transifex CLI client
- Install the latest version of the Command Line Interface (CLI) client by running:
curl -o- https://raw.githubusercontent.com/transifex/cli/master/install.sh | bash
For other methods of installing, or to get a specific version of the client, follow the instructions for installing the Transifex client for your system here.
Other dependencies
- Install
gettext(for extracting source strings from the documentation),pybabel(for extracting from the schema and codelists) anditstool(for extracting from SVGs):
$ apt-get install gettext
$ apt-get install python3-babel
$ apt-get install itstool
Configuration
- Create a Transifex API key in the user settings.
- Click on the “Generate a token” button on the right hand side.
- Click on “Copy and Close”.
- Save it locally; don’t commit it or share it or store it anywhere public.
- Optionally, so you don’t have to enter it at the commandine every time you use the client, you can create a file called
.transifexrcin your home directory (~/) with the following contents, replacing YOUR-API-KEY-SHOULD-GO-HERE with your newly generated api key:
[https://www.transifex.com]
api_hostname = https://api.transifex.com
hostname = https://www.transifex.com
password = YOUR-API-KEY-SHOULD-GO-HERE
username = api
See Transifex client configuration for more details.
Translation workflow
The BODS-main Transifex project holds the latest source files and the most up to date translations available.
Translations may not be available for the latest English text because translation happens in batches when the source files are stable (not under active development).
When changes to the docs, schema or codelists that are in scope for translation are merged into the main branch, and a phase of translation is set to begin, these changes should be pushed to the BODS-main project on Transifex.
The steps to do this are:
- Extract the text that has changed from the files into “strings” which are readable by Transifex.
- Upload (push) the strings to Transifex.
These steps happen after changes have been approved and merged into the main branch on Github. Never push to transifex from a development branch. Note that locally ‘extracted’ (English) strings (stored in .pot files) are ignored: they do not get pushed to the remote Github repository.
Updates to the documentation and schema should not be released until the translations are complete.
After translations have been added in Transifex, the translated strings (.po files) do need to be added to the Github repository so that ReadTheDocs can build everything in other languages. The steps to do this are:
- (Once) Make a new translation staging branch off
main.
Stages 4 and 5 may need to be repeated several times.
- Download (pull) the translated strings from Transifex into this translation staging branch.
- Preview and commit changes.
Finally
- Merge translations back into main branch
To run the steps in the translation workflow, ensure that you have followed the installation and setup instructions.
1. Extract the strings
Before you start, run tx pull -a to make sure you have the most up to date translations in your local environment.
Run the following commands from the root directory of the repository unless otherwise specified.
If you modified the schema:
- Run
pybabel extract -F babel_bods_schema.cfg . -o docs/_build/gettext/schema.pot
If you modified the codelists:
- If you changed (add, remove, rename) a column heading in a codelist CSV, edit the
babel_bods_codelist.cfgfile to match. - Run
pybabel extract -F babel_bods_codelist.cfg . -o docs/_build/gettext/codelist.pot
If you modified an SVG diagram:
- Run
itstool -i svg-its-rules.xml -o docs/_build/gettext/svg.pot docs/_assets/*.svg
If you changed the documentation:
- Change to the
docsdirectory (cd docs) - Run
make gettextto extract translatable English strings. This generates.potfiles intodocs/_build/gettext/.
2-a. Update the configuration
If you added, deleted or renamed files or you want to use a different Transifex project, run (from root):
rm -f .tx/configto delete the old config filesphinx-intl create-txconfigto create a new empty config filesphinx-intl update-txconfig-resources --pot-dir docs/_build/gettext --locale-dir docs/locale --transifex-organization-name OpenDataServices --transifex-project-name bods-main(replacingbods-mainwith a different Transifex project name if necessary) to fill the config file with the file paths for the source strings.- Via a pull request, merge the updated .tx/config file into the main branch of the BODS repository.
2-b. Upload source files to Transifex
- Run
tx push -sto push the source files to Transifex.
Now the files are ready to be translated in Transifex. See ‘Teams and roles’ for project managing the translation process in Transifex.
3. Create a new translation staging branch off main.
- If you are still on the main branch, check out a new translation staging branch from which you will ultimately make a PR with the updated translations.
4. Download translations from Transifex
- On your local translation staging benach, fetch new translations when they’re complete: run
tx pull -f -ato fetch all, ortx pull -f -l ruto fetch a particular language (Russian in this case). (We force pull to ensure that local po files are always overwritten with translations from Transifex.) - If the SVGs were translated, build translated SVGs for each language using itstool, and commit these (because we can’t easily install itstool on readthedocs):
- Run
pybabel compile --use-fuzzy -d docs/locale -D svg - Replacing
<LANG>with language code, eg,ru(run this once per language):itstool -m docs/locale/<LANG>/LC_MESSAGES/svg.mo -o docs/_build_svgs/<LANG> docs/_assets/*.svg
- Run
5. Preview and commit changes
- Build the documentation locally to check how translated pages and diagrams look. (If necessary, edit source SVG diagrams on the translation staging branch, and rebuild them (4.2 above) until everything looks good.)
- Commit the new or updated .po files and SVGs in
docs/locale, eg.:git add docs/localegit add docs/_build_svgs/git commit -m "Translations: Add latest translations for the schema"
- Push local commits to the remote repo
- (Optional) You may want to set up a build on ReadTheDocs for the translation staging branch so that the translators and reviewers can see their work in situ.
6. Merge translations back into main branch
- Make a PR from the transation staging branch into main, with the new and edited translation files (and SVGs if applicable).
Translating the documentation theme
The steps for the Sphinx theme are in the sphinx theme README.
Once you have extracted the strings, you can follow the instructions to Update the configuration before pushing to transifex.
Note for developers: .po files from the Sphinx theme are included when you build the docs from data-standard thanks to the following line in docs/conf.py:
locale_dirs = ['locale/', os.path.join(oods.sphinxtheme.get_html_theme_path(), 'locale')]
So make sure the latest version of the theme is being installed if expected translations aren’t showing up.
Snapshotting a fully translated release of BODS
When a new version of BODS has been released, and the translation completed, we snapshot the translations in a new Transifex project to match the frozen git branch for the version.
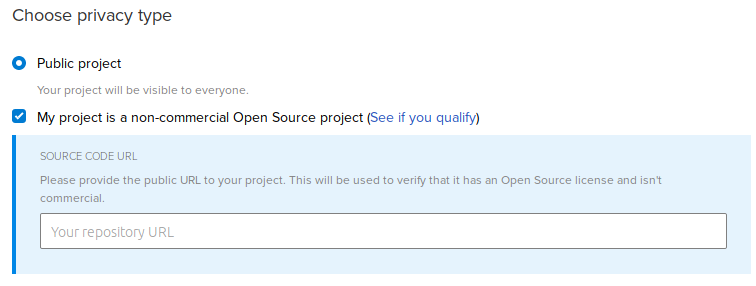
- Add a new project on Transifex.
- Name it according to the version of BODS, e.g.
bods-v05for BODS version 0.5. - Choose ‘public project’ and make sure to check the ‘My project is a non-commercial Open Source project checkbox’ and enter the Github repo URL.
- Assign the project to the BODS team.
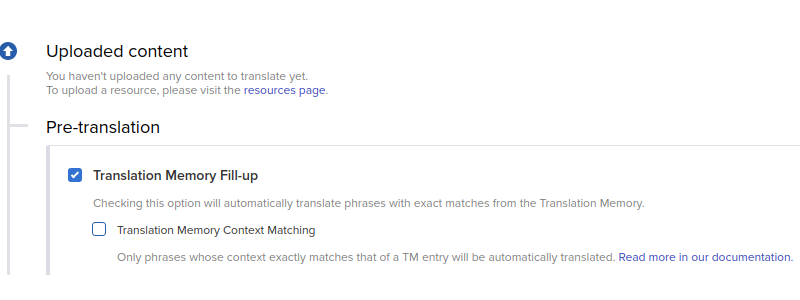
- Under the ‘Workflow’ tab choose “Translation Memory Fill-up” under “Pre-translation”.
- Check out or switch to the branch of the release from Github (eg.
git branch 0.5.0). - Extract the strings.
- Update the Transifex config to use the newly created Transifex project.
- Commit this change if you want all subsequent updates to the branch you are on to use the new Transifex project.
- Push the source files to Transifex:
tx push -sto push the source files to Transifex. - Run
tx push -ato push the translation files to Transifex. Use the-lflag if you only want to push certain languages (eg.tx push -l fr,ru).- Transifex only lets you push translations if it detects yours are newer than what it already has, but sometimes this fails - especially if you are pushing to an empty project. You can force it to accept translations from your local environment with
tx push -t -f- you will have to confirm (pressyand) each file by hand. Note that this will override anything already in Transifex, so make sure yours really are the latest.
- Transifex only lets you push translations if it detects yours are newer than what it already has, but sometimes this fails - especially if you are pushing to an empty project. You can force it to accept translations from your local environment with
Translation Memory
Transifex pre-fills translations for phrases which have previously been translated using Translation Memory, but this doesn’t work across projects. We can reuse the Translation Memory from another project when creating a new project with the following steps:
- Follow the steps to snapshot a translated release, where ‘release’ in these steps is the branch corresponding to the project with the Translation Memory you want to use. This essentially creates a mirror of the project you want to reuse the Translation Memory from.
- Check out the branch which contains the files you actually want to translate from Github.
- Delete your
docs/_builddirectory. - Extract the strings.
- Update the Transifex config to re-map the file paths of the source files.
- Push the source files to Transifex:
tx push -sto push the source files to Transifex. - Go to the new project in Transifex > Resources. Any source files which differ from the project you’re mirroring should appear partially translated. It may take some time for the Translation Memory to populate them; don’t panic if they don’t show up straight away. The parts that have been automatically populated appear as translated but unreviewed.
- If the project you’re mirroring contained source files that are no longer present in your new project (because the path has changed, or they were deleted), and you don’t want the translators to see these, go into the Transifex project > Resources and delete these by hand after the Translation Memory has automatically populated as much as it’s going to. Some of these can be easily spotted based on the last updated date/time, but be careful to differentiate between source files that aren’t present in your project, and files which didn’t change at all (and might appear as fully translated, from the project you’re mirroring).
Publishing translated documentation
Adding new languages on readthedocs
Once you’ve got all your translations, you need to publish them. The process for adding a new language version of the docs on readthedocs is as follows.
- Go to your readthedocs dashboard and click ‘Import a Project’, then ‘Import manually’ to the right.
- You probably want to name it something like “Beneficial Ownership Data Standard (LANG)”
- The Github URL is the base BODS repo, https://github.com/openownership/data-standard
- Check the box for ‘edit advanced project settings’
- Choose the language under Project Extra Details. The rest of the fields are intuitive, or have the right defaults.
- Go to Admin > Versions to activate any of the branches you need other than main. These should probably be the same ones as you have active in the main BODS readthedocs project, so the menus are consistent when the user switches language.
- Go to Builds to make sure the branch you need builds correctly. If it fails on a branch that the English version passes this is likely an indication that some translation files are missing. You can also preview it by clicking ‘view docs’.
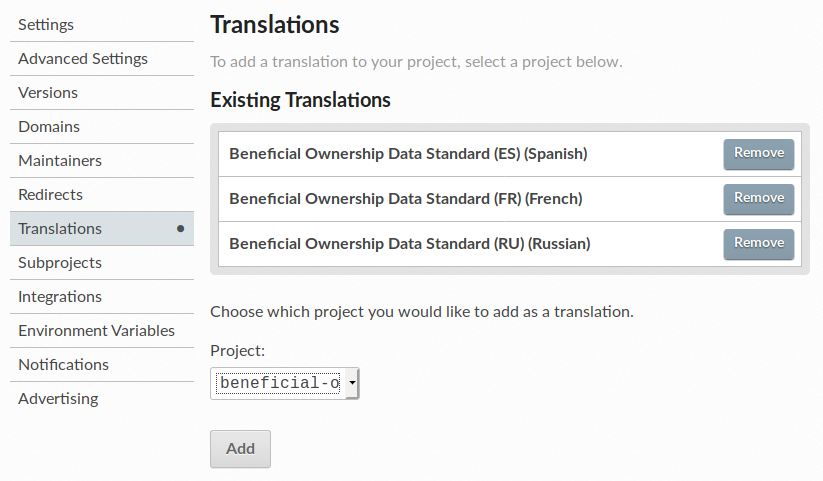
- Go back to the main (English) BODS project. In Admin > Translations, choose the new project you just created from the Project dropdown:
- The new language should now appear as an option in the readthedocs flyout menu for all versions of the HTML documentation.
These instructions were summarised from Localization of Documentation in the readthedocs docs.
Creating a preview
During the translation process, there will be points where it will be helpful to generate a preview to allow the translators and/or reviewers to see the translations in context.
Previewing on readthedocs
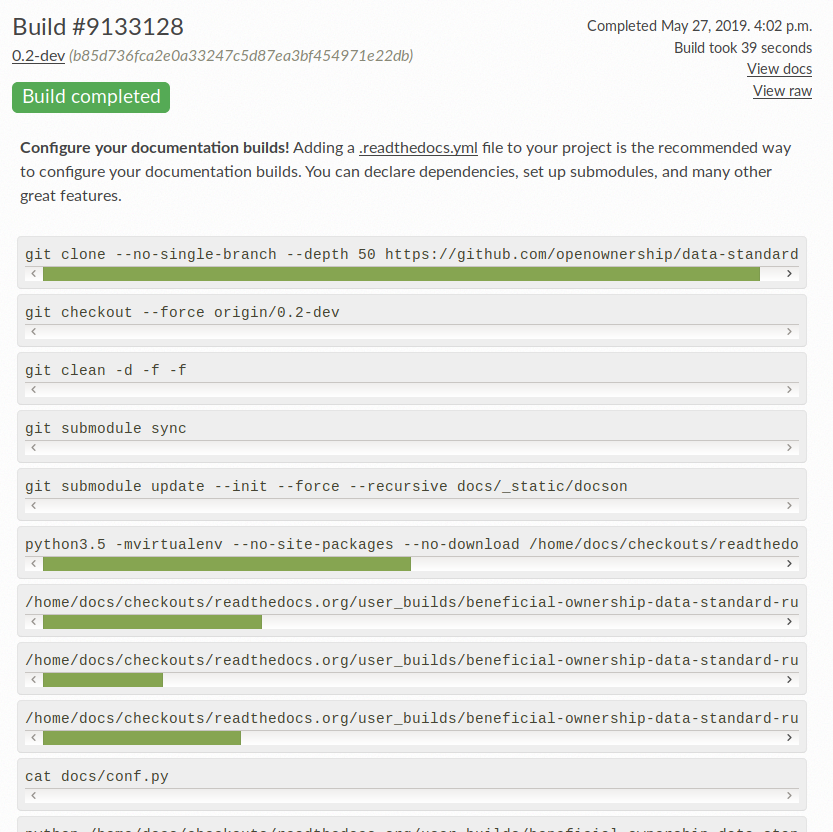
You can build this branch in readthedocs to preview it before publishing.
- Go to the readthedocs project for the particular language version of the docs you want to preview.
- If you have never built this branch before, you need to nudge readthedocs into seeing it; build any other branch, e.g. latest:
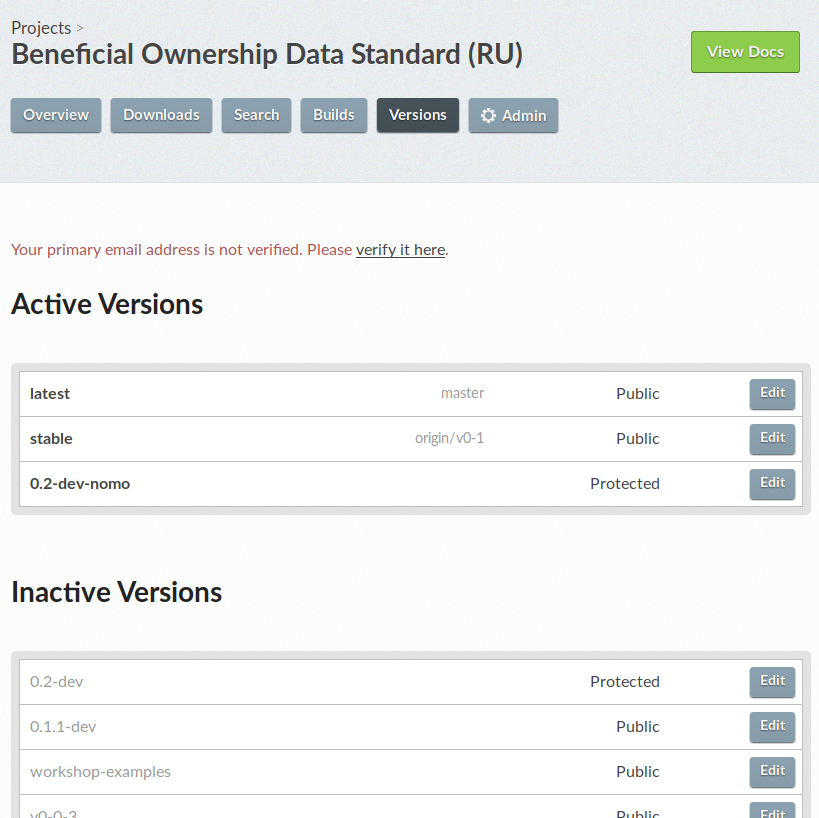
- Go to Versions on the main menu. Find your branch on the list of inactive branchs and click Edit on the right.
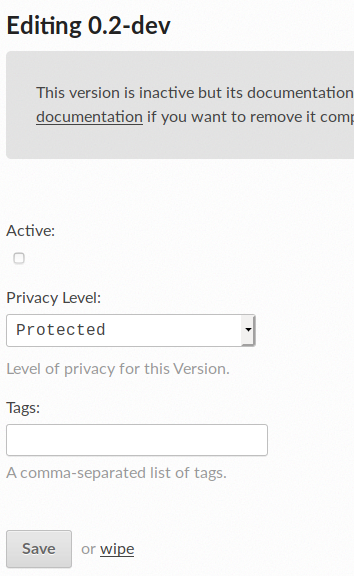
- Check ‘Active’ and set the dropdown to ‘Protected’ (this means the URL will work for sharing, but it won’t appear in the versions menu):
- Go to Builds. Your new branch should have already built automatically and appear at the top of the list, but if it hasn’t you can choose it from the dropdown and click ‘Build’. You can see the results by clicking on the latest build:
- You can preview it by clicking the green ‘view docs’ button in the top right. This will also provide you with a sharable link.
- You can rebuild it from the dropdown at the top of the Builds page every time you push new changes to Github.
- Don’t forget to switch it off when you’re done in Admin > Versions.
Teams and Roles
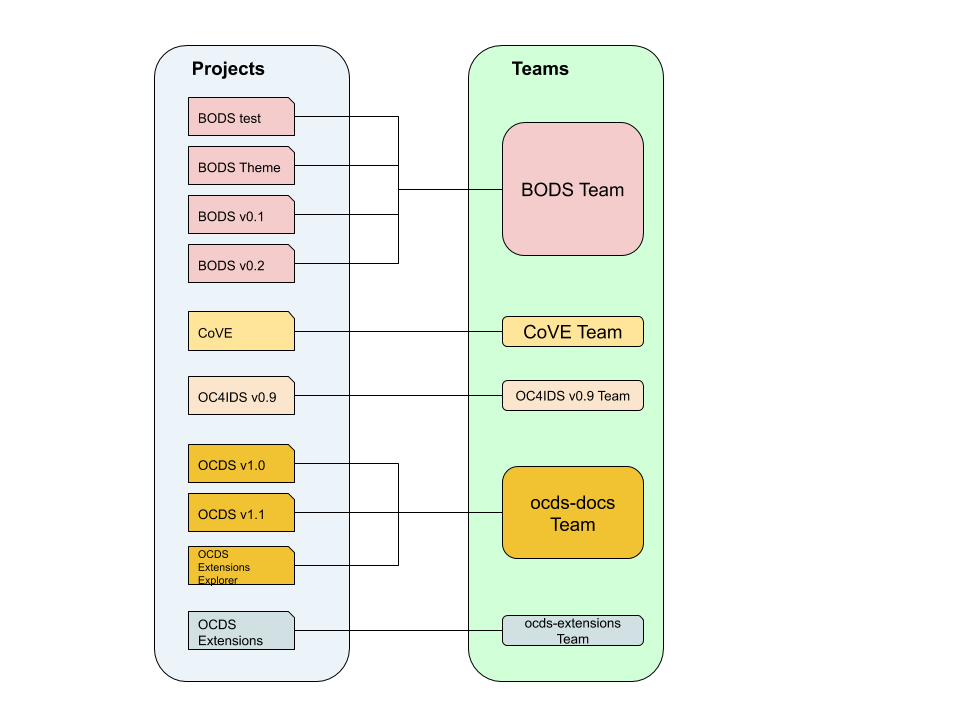
Teams are the groups of people who do the translations. Each project has just one team allocated to it, although a team can be allocated to more than one project. To illustrate this, below is a diagram showing the first ten projects listed under Open Data Services Co-operative (as at 2019-06-19) and the teams that are allocated to them.
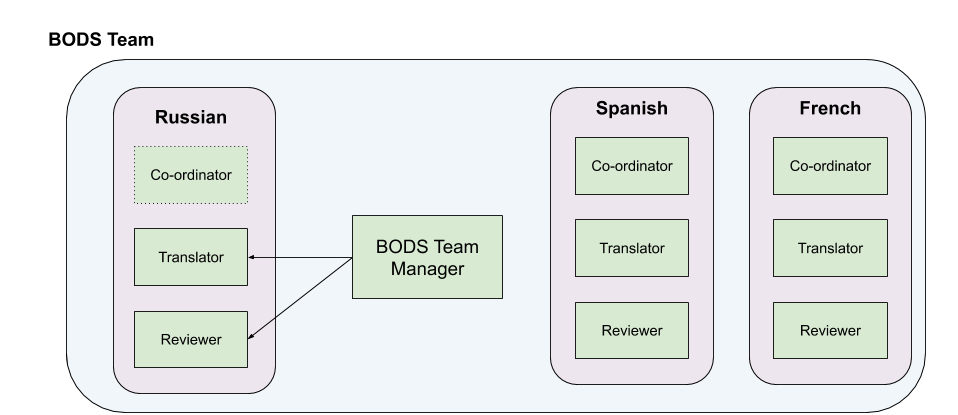
A team can consist of the following roles:
- A team manager
- A team coordinator
- Translators
- Reviewers
The BODS team consists of a team manager, translators and reviewers, with the team manager taking on the role of coordinator. We also use subject matter experts to maintain the glossary. They do not have to use Transifex. Their work can be done in a spreadsheet that is uploaded to Transifex by the team manager. In the future we intend to host the glossary in the data-standard repository.
The BODS team manager allocates the translators and reviewers to a specific language. As at the time of writing we have only set up a team consisting of the Members translating to Russian.
NOTE: The OCDS handbook specifies different roles. It separates out the “team manager” role into a “Release Manager” and a ‘coordinator’. We should review these two different ways of working to see if we can agree a common standard. It also details a proofreader role which is not supported under the Transifex free plan.
Team manager
Tasks:
- Create the project
- Co-ordinate the freeze on further development of the branch being translated
- Push strings to be translated up to Transifex
- Co-ordinate the work of the translators and reviewers
- Pull translated and quality tested strings down from Transifex
- Publish translated website using Read The Docs
Therefore they need:
Skills:
- To have an understanding of how Github works
- To understand and be able to manage the translation process in Transifex
- To understand and be able to manage organisations and teams in Transifex
- To be able to use the tooling to extract strings from the repositories
- To be able to push and pull extracted strings to and from Transifex
- To be able to add and update a translation of the website in Transifex
Translator
Tasks:
- Translate the strings in Transifex from the source language (by default, English) into the target language
Therefore they need:
Skills:
- To be native speakers of the target language and fluent in English (the source language)
- To be confident in using, or learning to use, Transifex.
Reviewer
Tasks:
- Review the translated strings in Transifex and provide feedback to translators and the team manager
Therefore they need:
Skills:
- To be native speakers of the target language and fluent in English (the source language)
- To have extensive experience of talking and writing about beneficial ownership in the target language
- To be confident in using, or learning to use, Transifex
- To have a pragmatic approach to translation, taking into account the wider context in which it may be used
Subject matter expert
Tasks:
- Translate beneficial ownership terms from the glossary’s source language into the target language, in an online spreadsheet (a Google sheet).
- Make notes in that same spreadsheet about the selection or use of any particular terms. (For use by translators.)
- Answer terminological queries from translators, if they come up.
Therefore they need:
Skills:
- To be native speakers of the target language and fluent in English (the source language).
- To have extensive experience of talking and writing about beneficial ownership in the target language.
- To be confident in using, or learning to use, Google sheets.
Access for translators
Translators should be given access to translate the main BODS project (documentation, schema, codelists), as well as the theme.
Translators and reviewers can follow the instructions here to sign up to Transifex: Transifex docs for translators.
Once a translator or reviewer has signed up to Transifex then an admiinistrator can add them to the BODS Team through the BODS team > Members translating to Russian page. Clicking on “Add translators” or “Add reviewers” will bring up this form
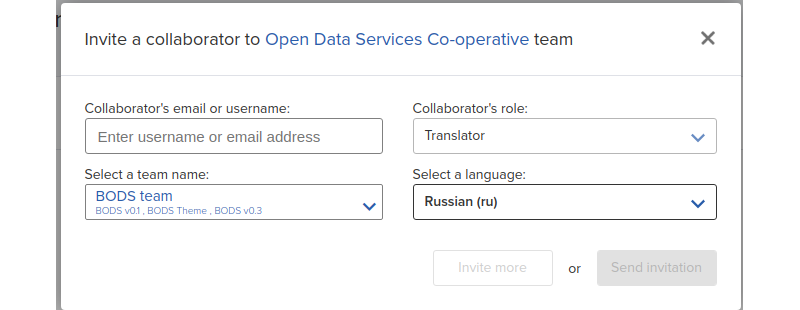
which can be completed to add the person to the project
Instructions for translators
Translators should be given access to the project on Transifex and also a link to the latest version of the data standard website for context.
Translators do not have to translate every word in the Transifex project. Any text wrapped in `s (e.g. `address`, `JSON document https://tools.ietf.org/html/rfc8259`) should not be translated. Special attention to this should be paid in the schema, schema-reference and concepts resources where they are used most. In the svg resource the names of objects and codes from a codelist are not to be translated. As a guide a link to a translated version of the Key Concepts page should be provided (e.g. https://standard.openownership.org/es/latest/schema/concepts.html).
The translation and review process
NOTE: This section describes a process that is different to how we have worked to date. As such it should be seen as a suggestion that is open to discussion.
Translators
Once the strings for the schema release have been uploaded to Transifex, the translator should be given access to the project and asked to begin the translation.
Translators should be aware that they will be required to take part in the review of their work. Details of this are in the following section.
Reviewers
There are two inter-linked tasks for a reviewer. A reviewer can choose to do these separately or together as they work through the project.
- Review all of the translated strings in the project
- Check all of the warnings* against the translated strings in the project
Transifex will warn users when certain translation checks fail. This includes cases when a term in the source file is translated to something other than the translation in the glossary.
Reviewers should make comments against the translation that are then resolved between them and the reviewer.
Comments are made against a string. Because a string can consist of an entire paragraph it is necessary to quote the part of the string that a comment is made against. Because a reviewer might query more than one part of the string it is necessary to create a reference for the comment.
A comment template is as follows:
#1 "selection-of-text-being-commented-on"
- Description of the problem that the reviewer sees in the translation
- Suggestion how this can be resolved
The translator can then accept the suggestion by editing the translated string or they can reply to the reviewer with an alternative suggestion or a request for clarification.
A template for a response to a comment is as follows
#1 "selection-of-text-being-commented-on"
- Response to the comment
Resolving differences
Where agreement cannot be reached by the translator and the reviewer it is the Team Manager’s role to decide what should be done. They may take a decision themselves, or seek external advice.